


Last Updated: October 25, 2026
Quick Summary
Make temporary volleyball courts safer by running the same checklist every event: verify flat, compacted ground, match anchors to the soil, drive stakes at an angle away from posts, share guy-rope load evenly, and mark the free zone. Inspect padding, antennas, and hardware before the first serve, and set a wind threshold with a shutdown plan.
- Test ground with a probe stake; if it sinks under light hand pressure, it is too loose.
- Drive stakes angled away from the post so pull runs against undisturbed soil.
- Mark the free-zone boundary with cones or tape, then place benches and coolers outside it.
- Set a wind threshold before the event; when reached, stop play and lower the net.
- Walk the full perimeter at player and spectator height before opening.
Table of Contents
- Why Temporary Volleyball Courts Fail Safety Checks
- Your Temporary Volleyball Court Setup Checklist
- Volleyball Net Anchoring Safety: Stakes, Straps, and Tension
- Volleyball Court Clearance Requirements Most Organizers Miss
- Volleyball Equipment Inspection Checklist for Opening Day
- Weather, Wind, and Emergency Shutdown Procedures
- Choosing a Portable System That Meets Your Safety Standard
- Next Step: Build Your Court Safety Kit with Sports Vista USA
- Frequently Asked Questions
Why Temporary Volleyball Courts Fail Safety Checks
Improving safety standards for temporary volleyball court setups starts with understanding why they fail in the first place.
A temporary volleyball court is a playing area assembled for a limited event, then disassembled, which means every safety decision has to be made from scratch each time.
Watch out: the most common failure is anchoring a post in soft, uncompacted soil because it "looked fine" from standing height.
The checklist below covers the full sequence, from site selection to shutdown.
Your Temporary Volleyball Court Setup Checklist
A temporary volleyball court setup checklist is a fixed sequence of checks covering site selection, ground preparation, measurement, anchoring, and inspection before the first serve. Running the same list every time is what separates a safe event from an incident report.
Here is the order we recommend.
| Stage | What to Verify | Frequency |
|---|---|---|
| Site selection | Flat grade, drainage, clear free zone | Every event |
| Ground prep | Compacted soil, no debris or holes | Every event |
| Measuring | Post spacing and net height | Every event |
| Anchoring | Stakes, guy ropes, tension | Every event |
| Inspection | Padding, antennas, hardware | Before opening |
| Weather check | Wind, storm forecast, shutdown plan | Morning and midday |
Site Selection and Ground Preparation
Pick the flattest, best-draining patch of ground available, then walk it before anything else.
For local conditions, the Illinois State Water Survey publishes soil and drainage information that helps organizers understand how ground behaves after rain.
Clear the playing surface of rocks, roots, and glass. Mark the court dimensions and the free zone around it before a single post goes in.
Measuring, Positioning, and Raising the Net
Measure twice, stake the corners, and only then position the posts.
Positioning errors compound. A post set a few inches off square pulls the net out of alignment and puts uneven load on the anchoring.
Raise the net slowly, checking tension at each stage rather than cranking it tight in one motion. Height adjustment should be verified with a gauge or measuring tape at center court, not by eye at the post.
Volleyball Net Anchoring Safety: Stakes, Straps, and Tension
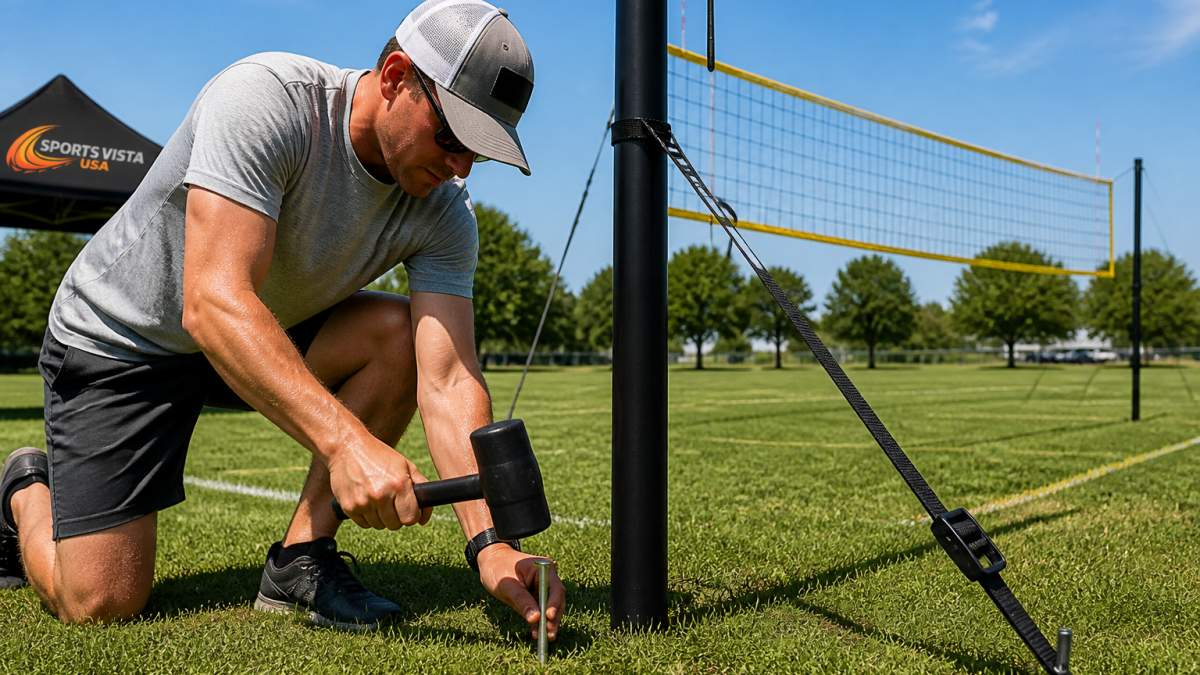
Volleyball net anchoring safety comes down to four things: matching the anchor type to the ground, driving stakes at the correct angle, sharing load evenly across guy ropes, and setting tension so the net holds firm without pulling the posts inward. On a temporary court, every one of those decisions is made fresh each event, so the anchoring plan has to be repeatable.
Match the Anchor to the Ground
An anchor only works if the soil around it can resist pull. A common pattern in temporary setups is using the same stake on firm native soil, loose fill, and sand, then wondering why one post holds and the other leans.
- Firm, compacted native soil: long stakes driven at an angle hold well. Test by driving a probe stake before the event; if it sinks with light hand pressure, the ground is too loose for a standard stake.
- Loose fill, gravel, or disturbed soil: stakes alone are unreliable. Use a wider-footprint base or a ballasted portable system, and re-check seating after warm-up play.
- Sand: standard stakes pull out under net tension. Sand-specific anchoring or a weighted-base system is required; do not substitute longer stakes for the right anchor type.
Drive Stakes at the Correct Angle
Drive stakes at an angle away from the post so the pull runs against undisturbed soil, not the loosened plug directly beside the post.
Keep the angle consistent on all four corners. If one stake is driven at a shallow angle and another near vertical, the load path is uneven and the post with the weaker anchor takes more strain.
Share Load Evenly Across Guy Ropes
Keep guy ropes symmetrical on both sides; an uneven pull is what tips a post. Walk the perimeter and check that each rope has similar slack before tensioning. A rope that is noticeably tighter than its opposite is a sign the post is being pulled off vertical.
Set Tension Without Bowing the Posts
Tension the net in stages, checking post verticality at each stage rather than cranking it tight in one motion. A tensioned net acts like a sail, so the goal is a firm net with straight posts, not maximum tightness.
Pass/Fail Anchoring Checks
| Check | Pass | Fail |
|---|---|---|
| Stake angle | All stakes angled away from post, consistent | Mixed angles or stakes angled toward post |
| Stake seating | Fully driven, no movement under hand pressure | Any wobble or exposed shaft |
| Guy rope symmetry | Opposite ropes have similar slack | One side noticeably tighter |
| Post verticality | Posts straight before and after tensioning | Any lean after net is tensioned |
| Ground condition | Firm, compacted, no standing water | Soft, loose, or saturated soil |
When you need a setup that holds its tension without constant re-adjustment, a semi-permanent system with proper standards can be a sturdier choice. For organizers who set up and break down often, a cable-free system can remove the tensioning hardware that is easiest to get wrong.

Volleyball Court Clearance Requirements Most Organizers Miss
Clearance requirements are the safety margins around the court, and they are the item organizers skip most often on temporary setups. The free zone needs to be clear of benches, coolers, tent stakes, and parked vehicles, and it needs to be measured, not eyeballed.
Measure the Free Zone, Don't Estimate It
Court dimensions and free-zone requirements differ by level of play and by the rulebook your event follows. Before setup, confirm the required free zone for your level of play against the current rulebook, then mark it on the ground with cones or tape.
A practical pattern for temporary courts: mark the court lines first, then mark the free-zone boundary at the required distance on all sides, then place every bench, cooler, tent, and spectator chair outside that second line.
Keep Spectators Outside the Buffer
Spectator seating belongs outside the free zone with a buffer, not at the edge of the line. Players chasing a ball do not stop at the boundary, and a folding chair at the line is a collision waiting to happen.
Gared Mongoose Wireless Volleyball System →
Set a spectator boundary with tape or cones and brief whoever is managing the crowd. On temporary courts, the crowd boundary often moves during the event as spectators drift; re-check it at midday.
Accessibility and Emergency Access
Accessibility matters too. Leave a firm, unobstructed route to the court for wheelchairs, carts, and emergency access, and keep that route clear all day. A route that is clear at 8 a.m. can be blocked by a cooler or a parked cart by noon.
- Keep the accessible route at least as wide as the widest equipment that must use it, and free of cables, guy ropes, and stakes.
- Mark guy ropes and stakes with cones or flags so they are visible outside the free zone.
- Confirm that an emergency vehicle could reach the court edge without crossing the playing surface.
Temporary Trip Hazards Unique to Pop-Up Courts
Temporary setups create trip hazards that permanent courts do not: guy ropes running to stakes, power cables to scoreboards or lights, tent stakes, and cooler handles. Route cables and ropes outside walking paths where possible, and mark anything that must cross a path.
Clearance Pass/Fail Checks
| Check | Pass | Fail |
|---|---|---|
| Free zone marked | Cones or tape at required distance on all sides | Lines only, no free-zone boundary |
| Spectator boundary | Seating outside free zone with buffer | Chairs at or inside the line |
| Accessible route | Firm, unobstructed, marked | Blocked by equipment or cables |
| Ropes and stakes | Marked and outside walking paths | Unmarked or crossing paths |
| Emergency access | Vehicle can reach court edge | Route crosses playing surface |
Set cones or tape to mark the free zone so players and spectators can see the boundary even after the lines fade.
Volleyball Equipment Inspection Checklist for Opening Day
Run this inspection before the first serve, every time. For the ongoing tasks that keep a court safe over time, see this volleyball court maintenance checklist.
- Posts vertical and firmly seated
- Stakes fully driven, guy ropes taut and symmetrical
- Net tension even across the full width
Weather, Wind, and Emergency Shutdown Procedures
Weather is the variable organizers cannot control, and wind is the one that takes nets down.
Set a wind threshold before the event and write it into the plan. When it is reached, play stops and the net comes down. Do not wait to see if it passes.
Emergency shutdown procedure:
- Clear players from the court
- Lower the net to release tension
- Remove or slacken guy ropes
- Pull stakes once the net is down
- Secure loose equipment
Check the forecast the morning of the event and again at midday.
Choosing a Portable System That Meets Your Safety Standard
The right portable system is the one whose anchoring, tension, and height adjustment you can verify every time you set it up.
The Gared Mongoose Wireless Volleyball System uses a cable-free, tool-free design for grass, sand, and hard courts, with consistent net tension and no complicated tensioning hardware to check.

The Apollo Recreational Volleyball System includes two uprights, a competition-grade net, guy ropes, stakes, and a carry bag, with telescoping uprights that adjust from 5 ft to 8 ft for different age groups.

For a sturdier semi-permanent install, the Gared Sideout Outdoor Volleyball System with 3-1/2in standards is built for high-traffic facilities like schools and parks.
Best for: the Mongoose Wireless suits recreation programs and multi-sport facilities that set up and break down often. Skip if: you need a permanent competition installation.
Next Step: Build Your Court Safety Kit with Sports Vista USA
Safe temporary volleyball comes down to discipline: the same checklist, the same anchoring checks, and a shutdown plan agreed before the first serve.
Sports Vista USA stocks portable and semi-permanent volleyball systems, nets, posts, padding, and court accessories, with delivery details confirmed after you order. Browse our full volleyball equipment collection to build a safety kit around your court.
Get started with Sports Vista USA and set up a court you can trust every time.
Frequently Asked Questions
How do you set up a temporary volleyball court safely?
Start with a level, cleared area and measure the court before driving any stakes. Set the net at the correct height for your age group, anchor guy ropes at a wide angle, and tension the net evenly so the top band stays straight. Walk the entire perimeter looking for stakes, ropes, and guy lines that could trip a player, then confirm the free zone around the court is clear of benches, coolers, and spectators before the first serve.
How should a temporary volleyball net be anchored?
Anchor guy ropes to ground stakes set well outside the playing area, not at the base of the post where players slide for a ball. Drive stakes at an angle away from the net so tension pulls them deeper into the ground. Check that every stake sits flush or below turf level, and mark any exposed line with a cone. Recheck anchors after warm-ups, since the first rallies put the most stress on a new setup.
How much clearance should there be around a volleyball court?
Clearance is the space between the court boundary and the nearest hazard, such as a fence, bleacher, bench, or parked car. USA Volleyball guidelines call for a free zone of at least 3 meters (about 10 feet) on the sidelines and 5 meters (about 16 feet) on the end lines for indoor competition; outdoor recreation courts often need more room for player movement and spectator seating. Measure from the lines outward and move anything that crowds that space.
How do you check volleyball net tension safely?
Press the center of the top band with a flat hand and watch for sag between the posts. A properly tensioned net holds a straight top band with the center strap pulling it down to the correct height. Tighten guy ropes in small increments, alternating sides so the posts stay vertical. Never stand on a bench or cooler to reach the net; use a step stool and have a second person steady the post.
What should be included in a volleyball court safety checklist?
A complete checklist covers ground conditions, post stability, stake and guy-line visibility, net height and tension, padding on posts, clearances to hazards, and a sweep for debris or standing water. Add a weather check and a designated shutdown caller. Run the same checklist before every session, not just opening day, and log any issues so the next organizer knows what to fix.
How can you make a temporary volleyball court safer for school or community use?
Assign one person to own setup and inspection, post the checklist at the court entrance, and brief players on the free zone and guy-line locations before play. Use post padding, cone off anchor points, and keep spectators behind a marked line. For school and park programs, a portable system with tool-free setup and consistent net tension, such as the Gared Mongoose Wireless Volleyball System, reduces the setup errors that cause most injuries.
Every temporary court carries risk that only preparation removes. Sports Vista USA supplies portable and semi-permanent volleyball systems, padding, and court accessories so organizers can meet a consistent safety standard, with product specifications and shipping details listed on each page. Get started with Sports Vista USA and build a court safety kit that holds up event after event.


Leave a comment
This site is protected by hCaptcha and the hCaptcha Privacy Policy and Terms of Service apply.